
The NotebookBar (NBB) or tabbed interface is an alternative user interface for LibreOffice. In the second part of this series, I explain the way the NotebookBar takes icons and text to create the final output that you see on the screen.
Creating NotebookBar is LibreOffice Code
Currently, the NotebookBar is not exactly like the other UI files that in LibreOffice with weld mechanism. In the first part of the series of blog posts on this topic, I discussed the custom widgets in notebookbars and how to edit them using Glade.
The custom widgets rely on C++ code, especially for sizing and other characteristics. For example, Priority Merged Horizontal Box (sfxlo-PriorityMergedHBox) is a “horizontal box hiding children depending on its priorities”. It needs C++ code to implement the priority display of the children. If you search for it in C++ files, you will reach builder.cxx:
$ git grep -l sfxlo-PriorityMergedHBox "*.cxx"
vcl/source/window/builder.cxx
The above file is a huge > 100 KB C++ source code that handles NotebookBar custom widgets, but also handles every other VCL widget.
The other parts of the relevant code for the NotebookBar resides in below files. Search for both “Notebookbar” and “notebookbar” in C++ files:
$ git ls-files "*otebook*cxx"
sfx2/source/notebookbar/NotebookbarTabControl.cxx
sfx2/source/notebookbar/SfxNotebookBar.cxx
vcl/qt5/QtInstanceNotebook.cxx
vcl/qt6/QtInstanceNotebook.cxx
vcl/source/control/NotebookbarPopup.cxx
vcl/source/control/notebookbar.cxx
vcl/source/window/NotebookBarAddonsMerger.cxx
Icons in Notebookbar
If you open the NotebookBar UI for LibreOffice Writer or other components like Calc, etc., what you see lacks two important things: icons and text.
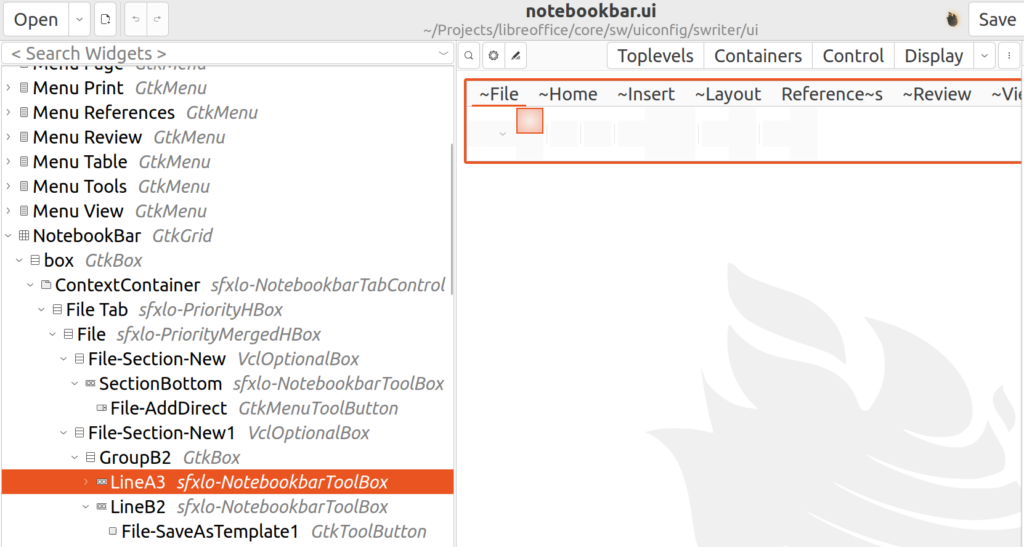
First, let’s look into icons. The icon files come from the set of icon themes that are available with LibreOffice. The icon theme of LibreOffice is configurable, therefore you do not see some specific LibreOffice icon in the design. That makes the work of UI designers harder, but lets LibreOffice choose among different icon themes.
You may find more information in the icon-themes/ module README.md file, which describes how to create new icon themes, and how to link the icons to specific icons via .xcu files. For example, in officecfg/registry/data/org/openoffice/Office/UI/CalcCommands.xcu you see:
<node oor:name=".uno:OpenFromCalc" oor:op="replace">
    <prop oor:name="Label" oor:type="xs:string">
        <value xml:lang="en-US">~Open...</value>
    </prop>
    <prop oor:name="Properties" oor:type="xs:int">
        <value>1</value>
    </prop>
</node>
This is defined for the UNO dispatch command, .uno:OpenFromCalc, which opens a file for Calc. The complete list of UNO dispatch commands is available here:
For each command, two icon sizes are created, one small and one big icon. lc_<command name>.png and sc_<command name>.png, if not in SVG format. At first, one should add the icons for a new command to the colibre theme, in order to be usable also with other themes.
Here, the filenames will be lc_openfromcalc.png and sc_openfromcalc.png, which are available in the instdir/cache/ folder. In this case, these icon files do not exist in LibreOffice source repository, as they use fallback icons sc_open.png and sc_open.png.
Text in Notebookbar
The text for the commands can be found alongside the other details about the command in the .xcu file. For the UNO dispatch command .uno:OpenFromCalc, you can see the text “~Open…” is used. “~O” is for activating the shortcut “O” for this command, and “…” shows that this command will open a dialog, as a usual convention.
Some other properties of this command are defined in .sdi file scalc.sdi, as shown below:
SfxStringItem OpenFromCalc SID_OPEN_CALC
()
[
    AutoUpdate = FALSE,
    FastCall = FALSE,
    ReadOnlyDoc = TRUE,
    Toggle = FALSE,
    Container = FALSE,
    RecordAbsolute = FALSE,
    RecordPerSet;
    Asynchron;

    AccelConfig = TRUE,
    MenuConfig = TRUE,
    ToolBoxConfig = FALSE,
    GroupId = SfxGroupId::Options;
]
Following the SID_OPEN_CALC symbolic constant in C++ code shows where the implementation resides.
As another example, you may follow .uno:AddDirect, and then SID_NEWDOCDIRECT to find the place where the menu that shows the possible new files is created. This menu becomes visible when you click on the v button on “New Document” in the File section of the notebookbar.
$ git grep -l SID_NEWDOCDIRECT
basctl/sdi/baside.sdi
basctl/source/basicide/basides1.cxx
dbaccess/source/ui/app/AppController.cxx
include/sfx2/sfxsids.hrc
sfx2/sdi/appslots.sdi
sfx2/sdi/frmslots.sdi
sfx2/sdi/sfx.sdi
sfx2/source/appl/appopen.cxx
sfx2/source/view/viewfrm2.cxx
sw/source/uibase/app/apphdl.cxx
sw/source/uibase/utlui/glbltree.cxx
There are both common and application specific C++ files in the above results. I will write more about the details of creating the final “New Document” menu and its menu items, in later posts.
Final Notes
The NotebookBar is a complex part of the LibreOffice user interface. If you want to modify and change it, it is important to understand how to create .ui files for notebookbar, how to use them in the code, and how to display the desired UI elements in notebookbar on the screen.
There are plans to improve the NotebookBar and make it more like other weld UIs. But, that is yet to be implemented: